Amazon Connect - Improve Customer Experience by Leveraging SSML
Introduction
Amazon Connect is one of the fastest growing AWS services. In the current climate it is easy to see why. One of the features that does not get much attention is SSML. SSML stands for Speech Synthesis Markup Language and is an XML-based markup language for speech synthesis applications. When used with Connect, SSML allows us to create more natural sounding speech patterns. In this article I’m going to outline some of the features & benefits of SSML and how to get started using it within your Amazon Connect Call Centre.
First Step Choosing Correct Voice
Our goal in improving the customer experience is to provide the most natural possible experience. The first step in achieving the natural experience is to choose an Amazon Polly voice that is appropriate to the user and geographical region. Out of the box the default voice is configured to be Joanna, an Amazon Polly Neural Text-to-Speech (NTTS) voice. Neural voices make automated conversations sound more natural. For a list of supported neural voices, see Neural Voices in the Amazon Polly Developer Guide.
Setting the Voice
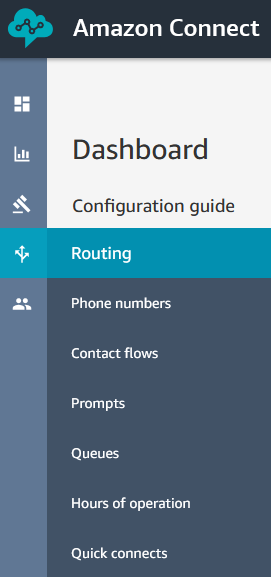
To get started you need to login into the Amazon Connect Service. From the Options on the left you will want to select Routing and the Contact Flows.
In the right of the screen we click on the Create contact flow button.

Our blank Contact Flow appears with the Entry Point block already added. You set the voice using the “Set Voice” Block. This can be found by expanding the Set Options on the left. Then drag the Set voice block onto the canvas using the cursor. Hover over the Start block to implement the connector between the Entry point and Set voice block.
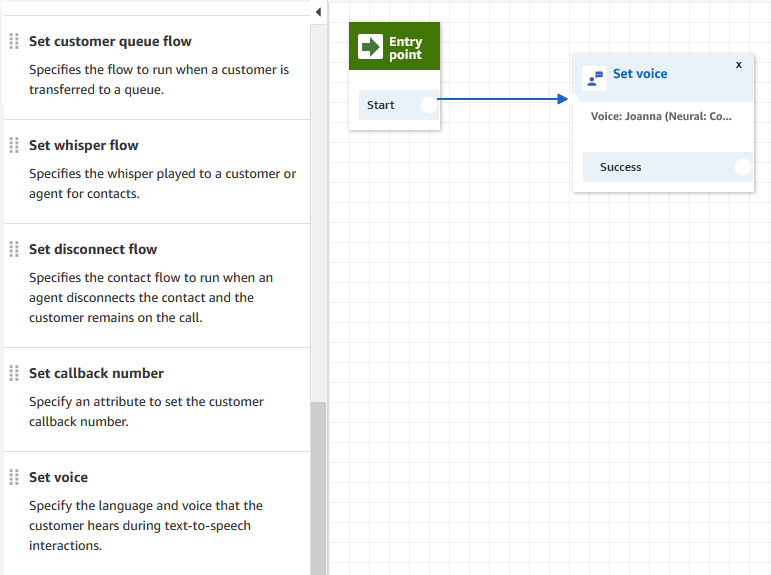
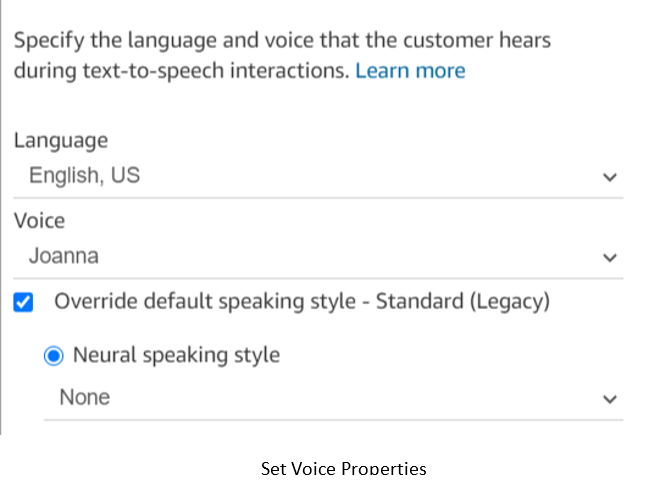
By clicking on the Set voice you can set the Language and Voice to be used throughout the flow. All the voices use the concatenative method in order to create the most natural sounding speech. At the time of writing there are over 50 voices that you can choose that cover a broad spectrum of languages. There are 4 voices Joanna, Matthew, Amy and Lupe where you have the additional option of Newscaster style which uses the neural system to generate speech in the style of a TV or radio presenter. There is also the option of using the Conversational style with 2 voices which uses the neural system to generate speech in a more friendly and expressive conversational style. The Conversational style is currently available only for the Matthew and Joanna voices, available only in US English (en-US).
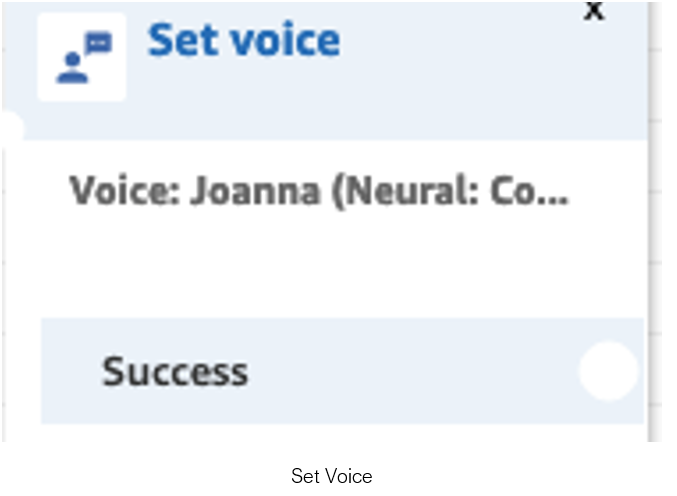
Once you have set our voice properties should see similar to the below image. The success should link to the next block in your flow.
Create Text to Speech Prompts
To add in an SSML speech block, drag a ‘Play Prompt’ or ‘Get Customer Input’ block from the ‘Interact’ menu on the left side of your Amazon Contact Flow. The difference between a ‘Play Prompt’ and ‘Get Customer Input’ is for ‘Play Prompt’ you are playing a message for your customer where ‘Get Customer Input’ is playing a message to illicit a verbal or keypad response from them. Your flow should now look something similar to below. You want to click on the ‘Play Prompt’ block to open it up for editing.

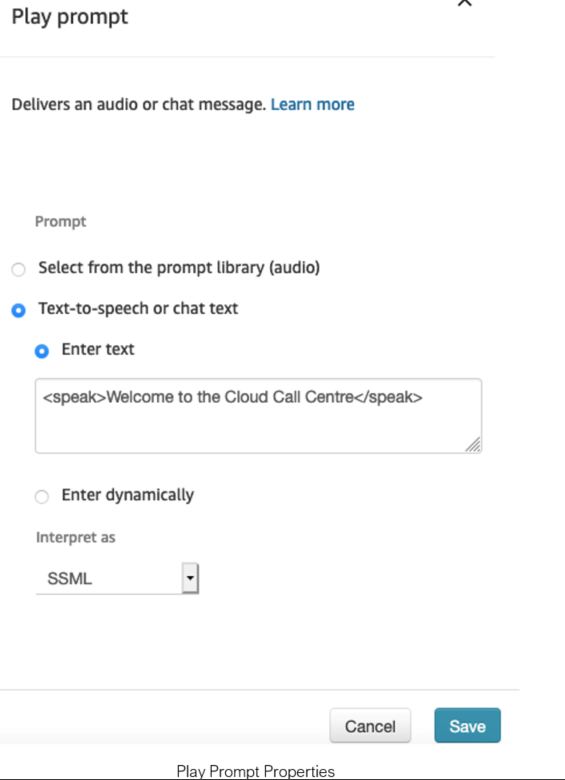
You want to select ‘Text to Speech’, enter the words you want to include, ensuring the words are between the starting speak and closing speak tags. It is very important then from the ‘Interpret As’ menu, you select ‘SSML’. If you don’t select SSML then Connect will ignore any tags you have included. Once you are happy you need to click Save.
Using SSML to Customise the Voice Experience
Up till now we have covered how to set the voice and enable SSML. In this section we will go a bit deeper into how we use SSML to create effects. Within SSML we use tags to create the natural sounding experience instead of the robotic experience that customers are traditionally used to hearing. The majority of the tags impact how a sequence of words are delivered rather than controlling the creation of a sound. Amazon provide detailed documentation for the SSML tags supported. All of the SSML tags supported by Amazon Polly are useful. However certain tags are used more frequently than others when implementing that natural voice experience for our customers. Below is brief description of the core tags to use:
-
speak All SSML content needs to be contained between the
and tag. Additional information is located in the Documentation -
p Text should be structured into related sections using the paragraph tag. Additional information is located in the Documentation
-
break There are frequently times when a specific pause is required to add clarity or provide time for user input. The tag can be customised using a preset attribute such as strength=medium or with a value attribute such as time=500ms. Additional information is located in the Documentation
-
emphasis The emphasis tag provides a simple means to add prominence to a single word or sequence of words, offering three levels of emphasis applied using a preset attribute such as level=”strong”. Additional information is located in the Documentation
-
prosody Prosody covers the parts of speech that don’t involve the pronunciation of words. The
SSML tag provides three attributes which affect volume, speaking rate and pitch. Additional information is located in the [Documentation](https://docs.aws.amazon.com/polly/latest/dg/supportedtags.html#prosody-tag) -
say-as Amazon Polly pronunciation is highly successful at most language but adding context helps produce more natural speech. This context can aid with the localisation of content for a specific region or adding slang. While Amazon Polly is able recognise everyday acronyms and pronounce them correctly, if there are acronyms that is specific to a country then it is necessary to make Polly aware. You can highlight that a word is an acronym using the attribute interpret-as=characters or interpret-as=spell-out. You can expand the interpret-as attribute to add context around numbers as required. Additional information is located in the Documentation
-
phoneme When Amazon Polly does not pronounce a word properly the
tag provides a means of describing how to make the correct sounds. You need to spell out how every individual phonetic sound is described in much the same way as a pronunciation is described in a dictionary which Amazon Polly then stitches together to produce the correct word sound. Additional information is located in the [Documentation](https://docs.aws.amazon.com/polly/latest/dg/supportedtags.html#phoneme-tag)
The following code demonstrates some of the above SSML tags in use. Suggest you try with and without the SSML in order to see the difference:
<speak>Welcome to the Cloud Call Centre
<p>Our opening hours are 8am to 8pm <break time="10ms"/>Monday to Friday</p>
<p>Please have your <say-as interpret-as="characters">PO</say-as> or <say-as interpret-as="characters">DN</say-as>available in order to speed up the call</p>
<p>In order for us to route your call properly<break time="100ms"/>please listen to the following menu options</p>
</speak>
Complete The Call Flow
In order to test your SSML you need to add “Set Working Queue”, “Transfer to Queue” and “Disconnect” blocks to your flow. For testing purposes you can choose the “BasicQueue”. In the top left of your flow, you will want to name the flow. You cannot save or publish the flow unless you have given it a name. If you follow the steps, you will have something similar to below.
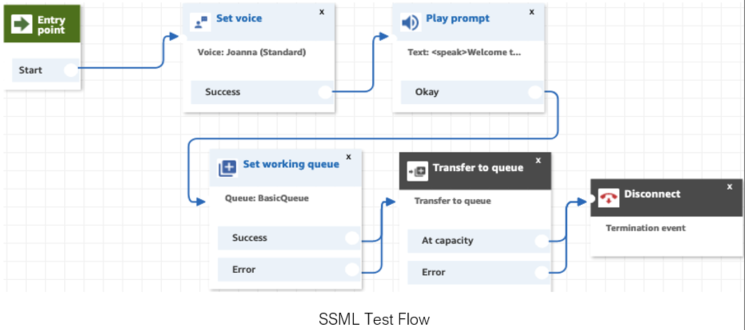
You will need to assign either a toll-free or DID (Direct Inward Dialing) telephone number to your SSML Test Flow in order to hear the output. Please ensure that you release the number once you are finished testing otherwise you will continue to incur charges. This is an example of a very simple call flow to show how you can test SSML in your environment. This is intended to show how to get started with SSML within Connect not down in the weeds of Polly and SSML.
Conclusion
We have all had that experience of phoning into a contact centre and hearing a robotic, impersonal voice on the other end. By leveraging the correct voice and the right SSML tags that more natural sounding experience can be achieved within your Amazon Connect instance. An engaged customer is a happy customer. This is just the start of what can be achieved. I will explore other features of Amazon Connect in subsequent posts that help create positive customer experiences.
