Using Amazon CloudFront to protect Amazon API Gateway - Part 1
Introduction
Welcome to another post covering various AWS products and services. The content in these posts is driven by what I’m working or investigating for use with my clients. It has been awhile since I last published some content but work and personal life have been hectic. I hoping to have more time in the coming months to write content.
Anyway back to matters at hand. In this blog post I’m going to show you how to use Amazon CloudFront as an additional layer of security in front for your Amazon API Gateway. In Part 2 we will expand the configuration to include a custom header that can be used with API Gateway Resource Policy. Finally in Part 3 we will add a Lambda Authoriser which will allow or deny access to API Gateway based on the x-forwarded-for or the cs value.
Amazon CloudFront
Amazon CloudFront is a content delivery network (CDN) service that delivers data, videos, applications, and APIs to users worldwide with low latency and high transfer speeds. It securely distributes content to various edge locations, which are servers strategically located around the globe to bring content closer to users. CloudFront integrates seamlessly with AWS services, allowing it to work directly with AWS Shield for DDoS protection, Amazon S3 for storing static assets, and other AWS tools. It automatically routes requests to the nearest edge location, reducing load times and enhancing user experience by minimizing the distance data must travel. CloudFront also supports real-time analytics and logging, providing insights into traffic patterns and helping to optimize content delivery.
Benefits of Using Amazon CloudFront
- Reduced Latency: Content is cached at edge locations close to users, leading to faster load times.
- Enhanced Security: Offers built-in protection with AWS Shield and supports SSL/TLS encryption.
- Scalability: Can handle large traffic volumes automatically, adjusting to demand without manual intervention.
- Cost Efficiency: Uses pay-as-you-go pricing, minimizing costs based on actual usage.
- Comprehensive Analytics: Provides detailed logs and metrics for monitoring and optimizing content performance.
Amazon API Gateway
Amazon API Gateway is a fully managed service that enables developers to create, publish, maintain, monitor, and secure APIs at any scale. It acts as a “front door” for applications to access data, business logic, or functionality from backend services, such as AWS Lambda, Amazon EC2, or other web services. API Gateway supports REST, HTTP, and WebSocket APIs, allowing for both synchronous and asynchronous communication with backend resources. It also includes built-in features for security, such as authentication and authorization, throttling, and request/response validation. With Amazon API Gateway, developers can deploy APIs quickly and scale automatically to handle large numbers of requests, improving both performance and reliability.
Benefits of Using Amazon API Gateway
- Scalability: Automatically scales to handle thousands of requests per second, supporting high-traffic applications.
- Cost-Effectiveness: Uses a pay-as-you-go pricing model, charging only for the API calls made and data transferred.
- Security: Supports integration with AWS IAM, Lambda authorizers, and Amazon Cognito for user authentication and authorization.
- Flexible API Options: Supports REST APIs, HTTP APIs, and WebSocket APIs to suit different application needs.
- Simplified Monitoring: Integrates with Amazon CloudWatch for monitoring API metrics, logging, and troubleshooting.
Creating Amazon API Gateway
Setting Up a Regional Amazon API Gateway Endpoint with a Mock Method
Setting up a regional Amazon API Gateway endpoint with a mock integration is a useful way to test an API configuration without involving backend resources. This guide provides a step-by-step process for configuring a mock API for testing purposes only.
Step 1: Access the API Gateway Console
-
Log into the AWS Management Console.
-
In the search bar, type “API Gateway” and select API Gateway.
-
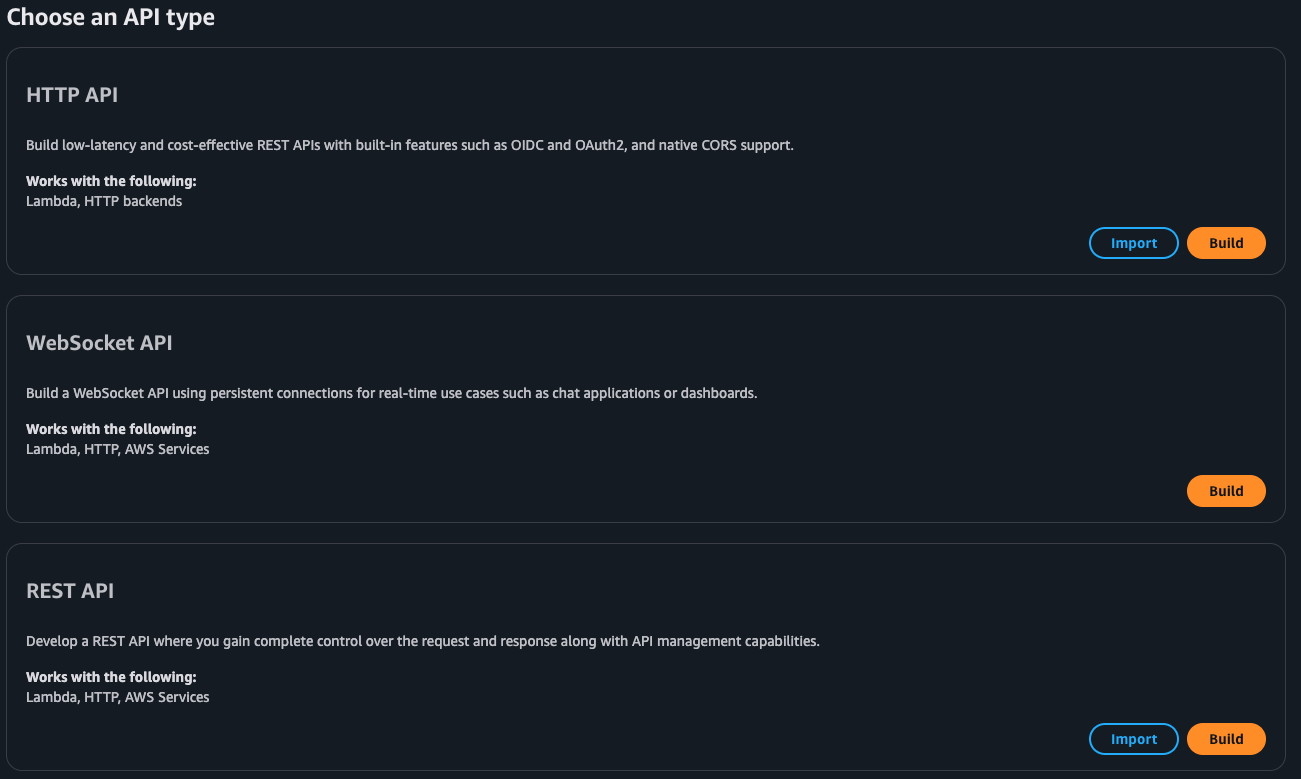
In the API Gateway dashboard, click Create API.
Step 2: Create a Regional REST API
-
Select REST API for the API type and select Build
-
Choose New API
-
In the configuration section, fill in the following:
- API name: Provide a name, such as “RegionalMockAPI”.
- Description (optional): Enter a description if desired.
- Endpoint Type: Select Regional to limit the API to your chosen AWS region.
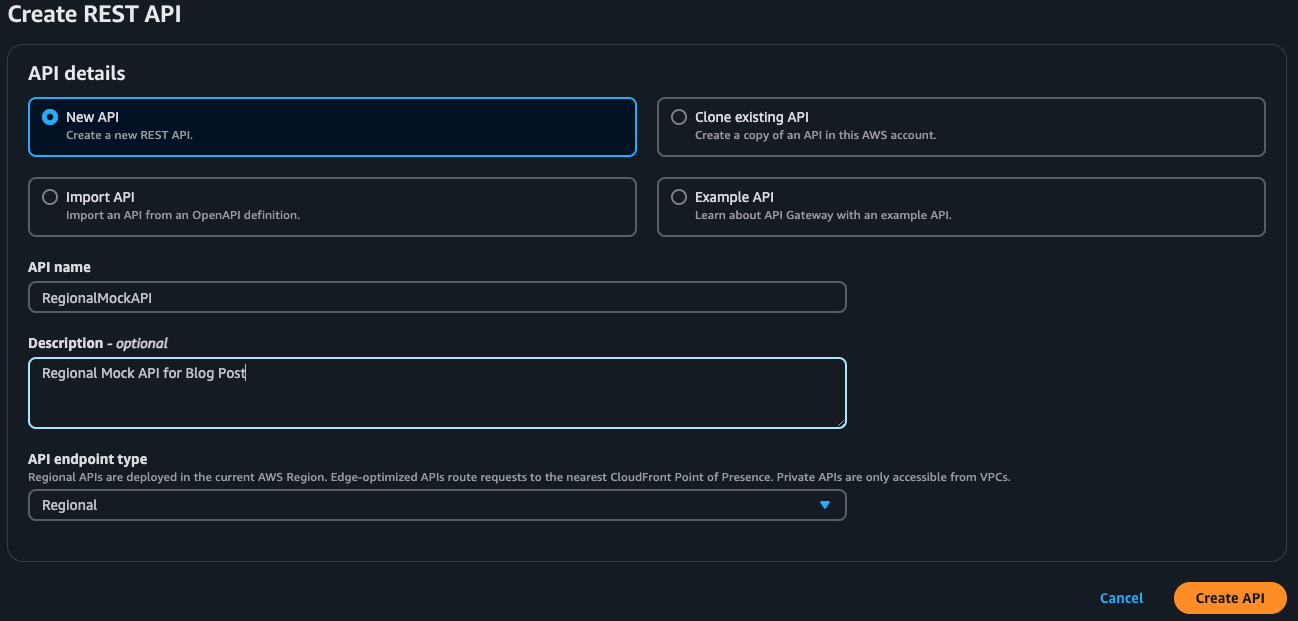
- Click Create API to create the API.
Step 3: Define a Resource
-
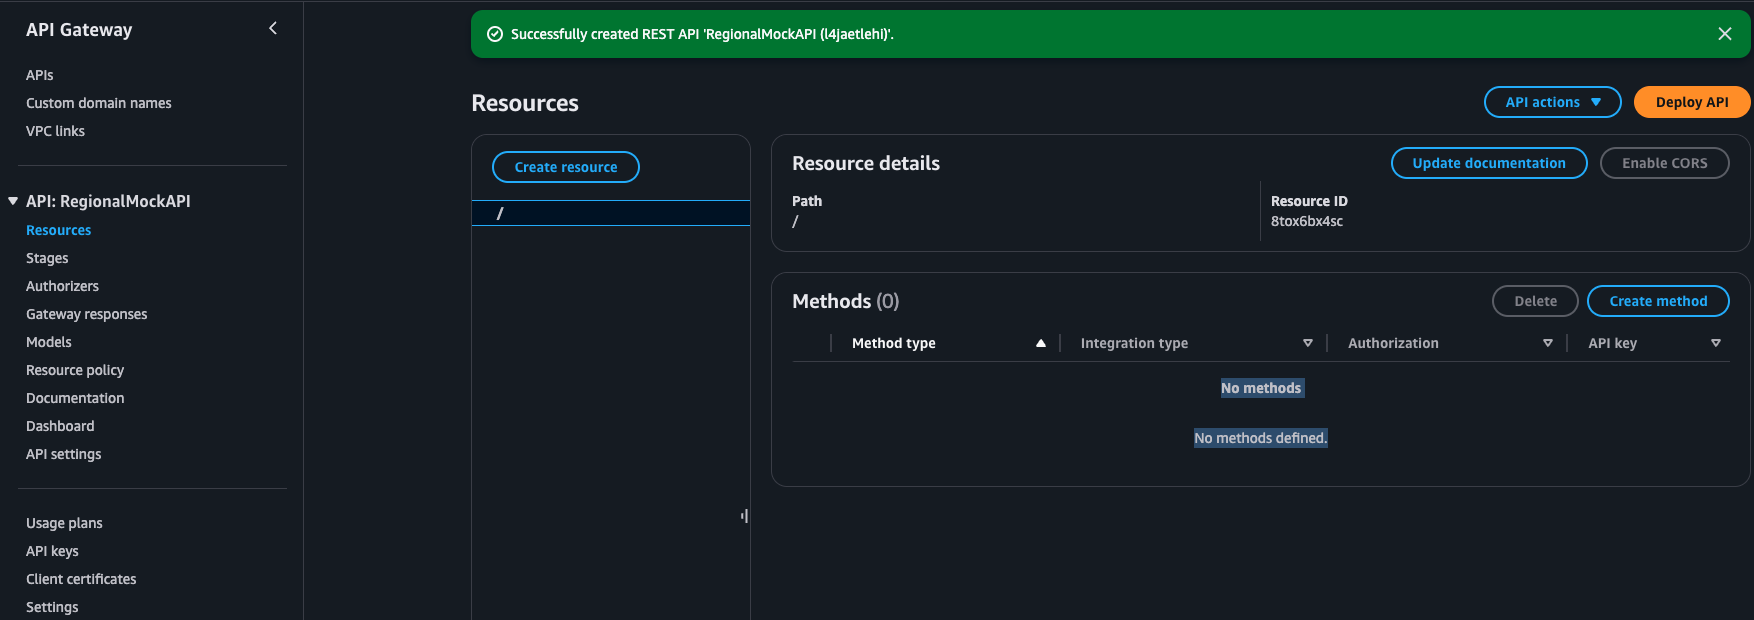
Once the API is created, go to the Resources section (you may be directed there automatically).
-
Select Create Resource to define a new resource for the API.

- In the New Child Resource configuration page:
- Resource Name: Enter a name, like “regionalmock”.
- Resource Path: This will auto-populate based on your resource name.
- Enable API Gateway CORS: Optionally select this if you intend to access the API from a browser client.
- Click Create Resource to complete this step.

Step 4: Add a Mock Method
-
Select your newly created resource (e.g.,
/regionalmock). -
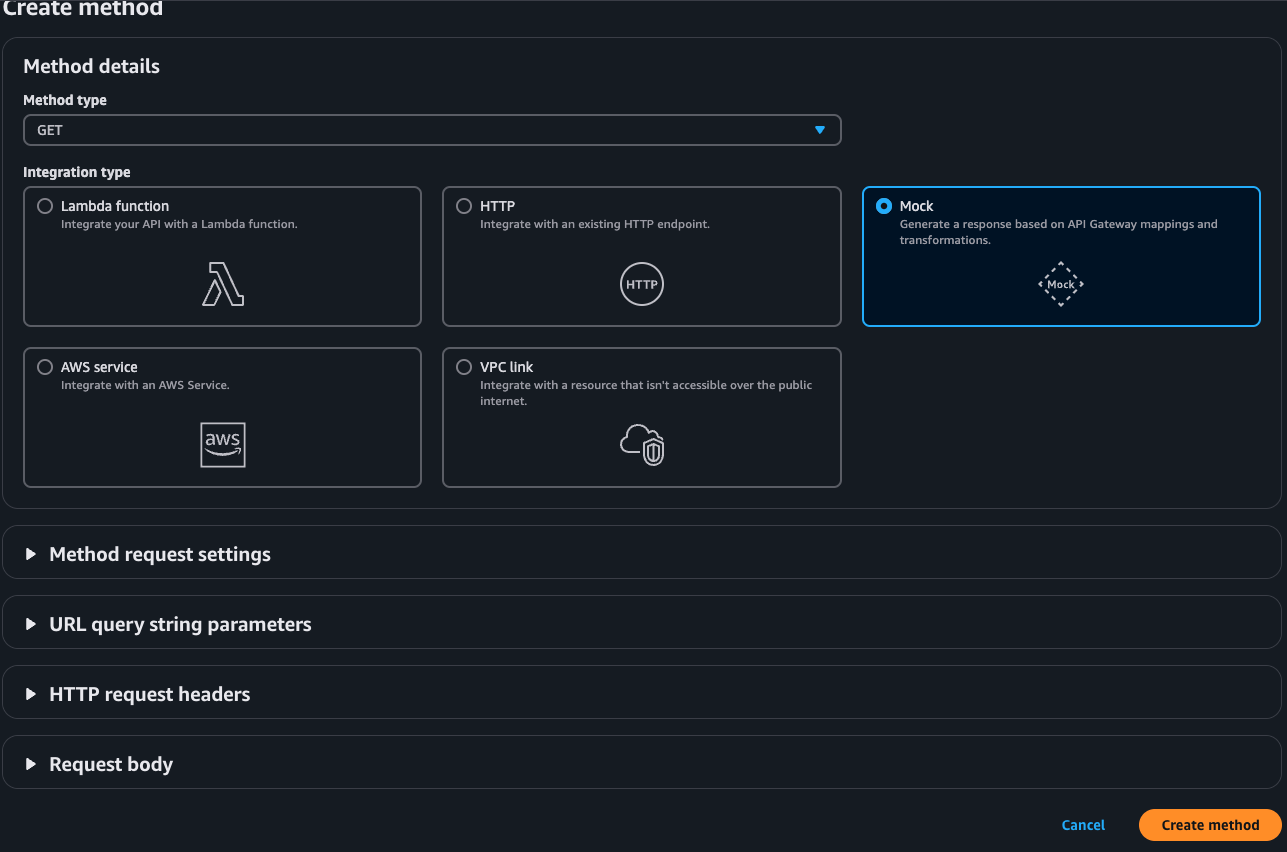
In the Actions menu, select Create Method.
-
Choose GET (or any HTTP method you want to test) from the dropdown and click the checkmark to confirm.
- In the Setup screen:
- For Integration type, select Mock.
- This integration type simulates a backend response without needing an actual backend.
- Click Create method to apply the settings.
Step 5: Configure the Method Response
-
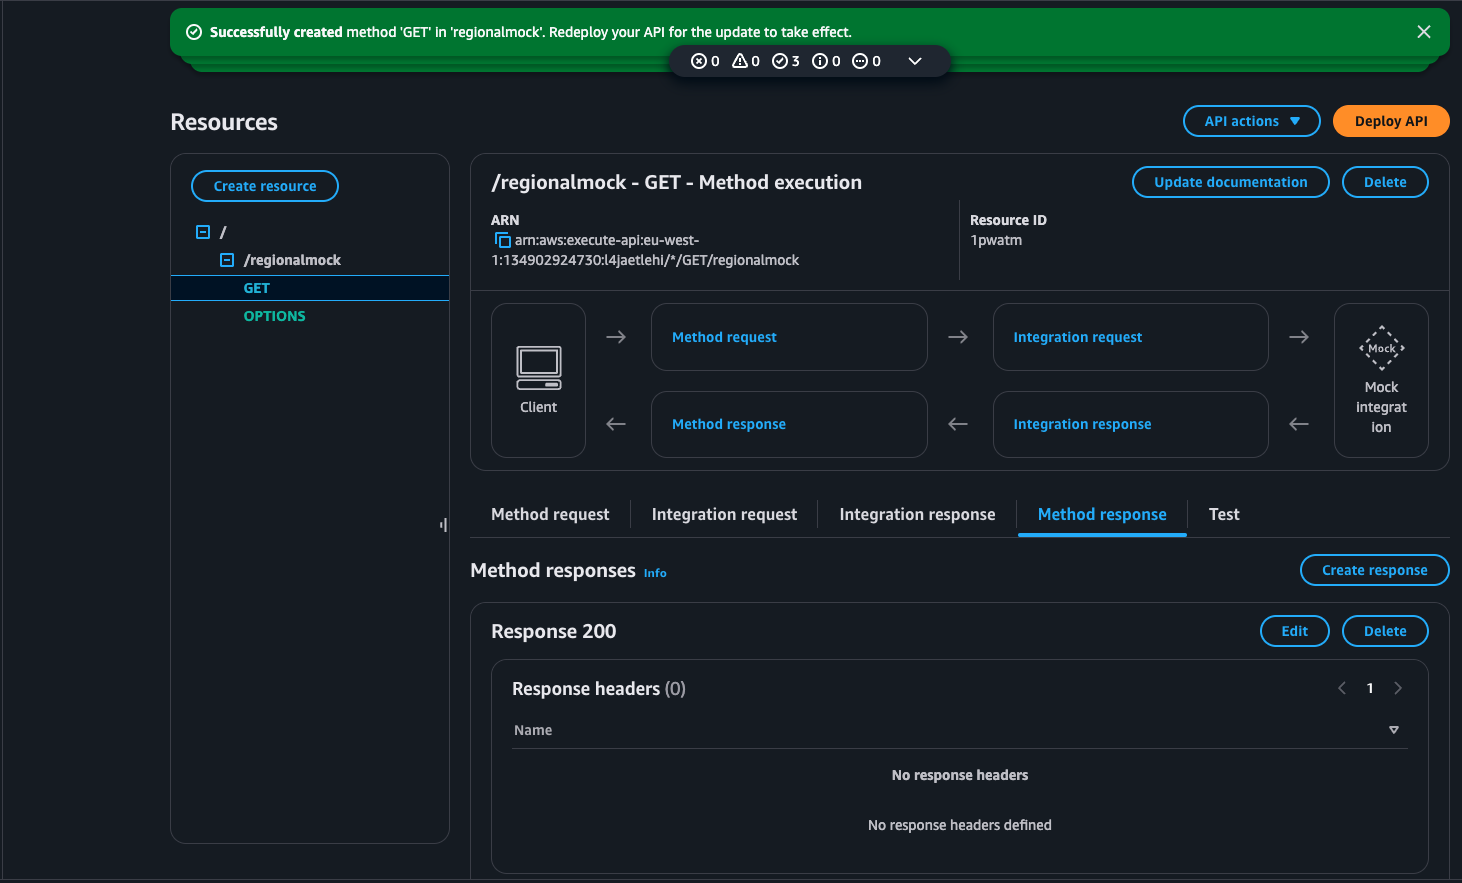
Expand the Method Response section. By default, there is usually a 200 response defined. If it’s not there, click Add Response and enter 200 as the response code.
-
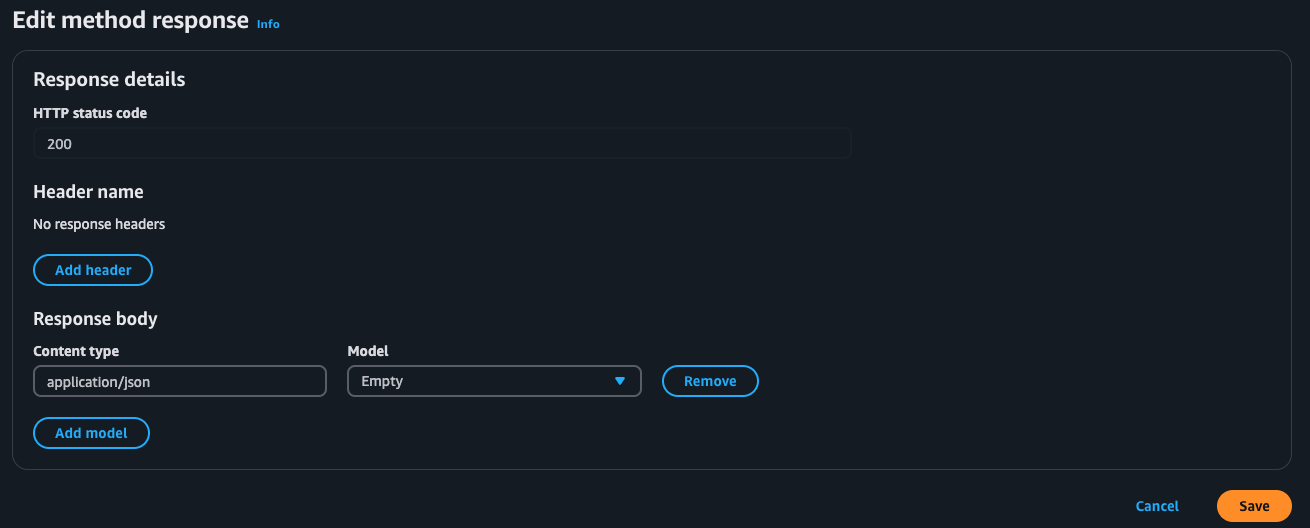
To define the structure of your mock response, click on 200 under Method Response.
-
In the Response Models section, add a Model if desired, such as application/json to represent a JSON response format.
-
If you don’t want to specify a model, you can skip this, but it helps with testing a structured response.
Step 6: Deploy the API
- On the right hand side of screen choose Deploy API.

- In the deployment configuration:
- Deployment stage: Select [New Stage] and name it, such as “dev” or “test”.
- Optionally add a Description to clarify the deployment purpose.
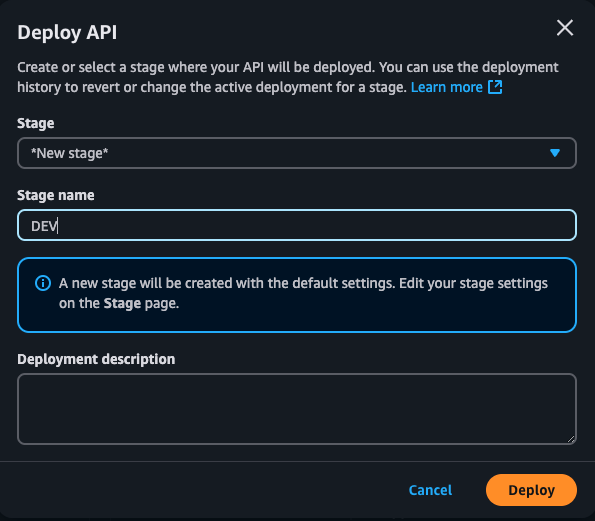
- Click Deploy.
Step 8: Test the Mock API
-
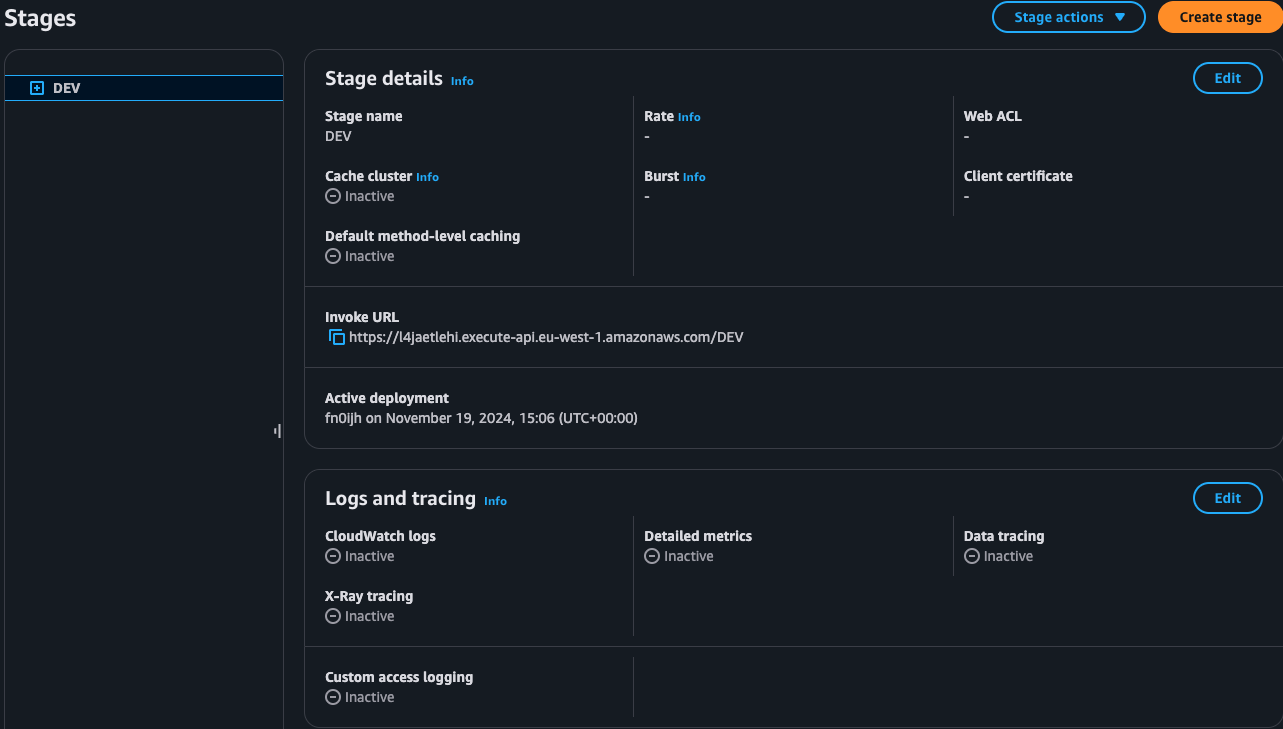
Once deployed, you’ll see the Invoke URL for your API stage. Copy this URL to test it in a browser or API testing tool (such as Postman).
-
Append the resource path to the URL (e.g.,
/test) and make a GET request. -
You should see the mock response you configured earlier, which confirms that your regional API endpoint with a mock method is set up correctly.
This setup allows you to validate the configuration and behavior of your API without any actual backend integration. When ready, you can replace the mock method with a real backend integration, such as a Lambda function or an HTTP endpoint.
Setting Up Amazon CloudFront for US & Europe with Access Restricted to Ireland and UK
This guide explains how to set up an Amazon CloudFront distribution for users in the U.S. and Europe, configured to use a regional API Gateway endpoint as the origin. The distribution will be restricted to users from Ireland and the UK only.
Prerequisites
- A regional Amazon API Gateway endpoint already set up. You will need the API’s Invoke URL as the origin for CloudFront.
Step 1: Access the CloudFront Console
-
Log in to the AWS Management Console.
-
In the search bar, type CloudFront and select CloudFront from the services list.
-
In the CloudFront dashboard, click on Create Distribution.

Step 2: Configure the CloudFront Distribution Settings
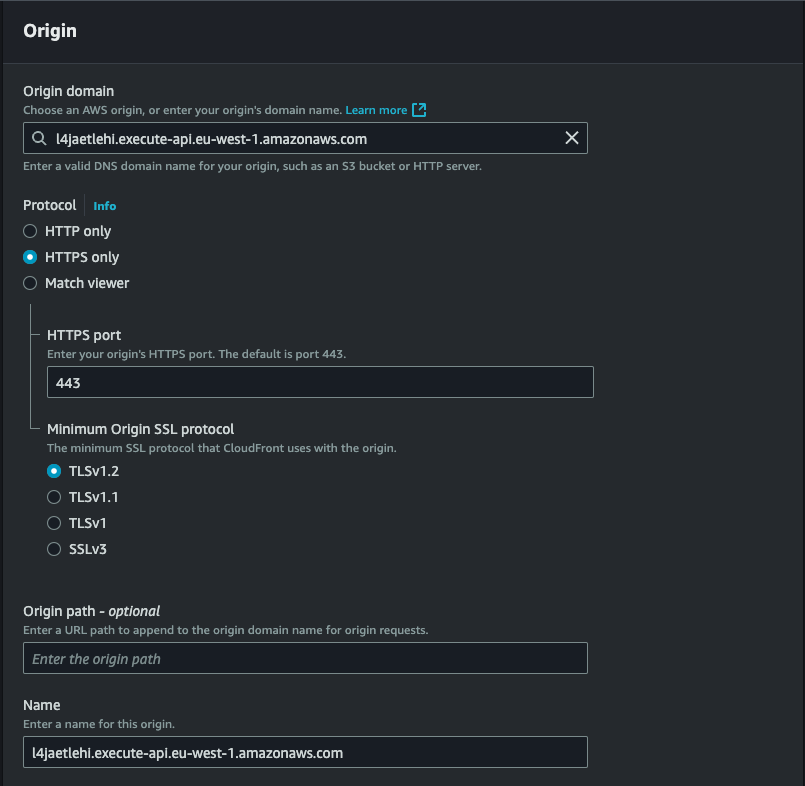
- In the Origin Settings:
- Origin Domain Name: Enter the Invoke URL of your API Gateway (e.g.,
https://your-api-id.execute-api.us-east-1.amazonaws.com). - Origin Path: Leave this blank unless you need to specify a path in the API.
- Origin ID: This is automatically generated; you can leave it as is or customize it.
- Origin Protocol Policy: Choose HTTPS Only to ensure secure communication between CloudFront and the API Gateway.
- Minimum Origin SSL Protocol: Set this to TLSv1.2 for enhanced security.
- Origin Domain Name: Enter the Invoke URL of your API Gateway (e.g.,
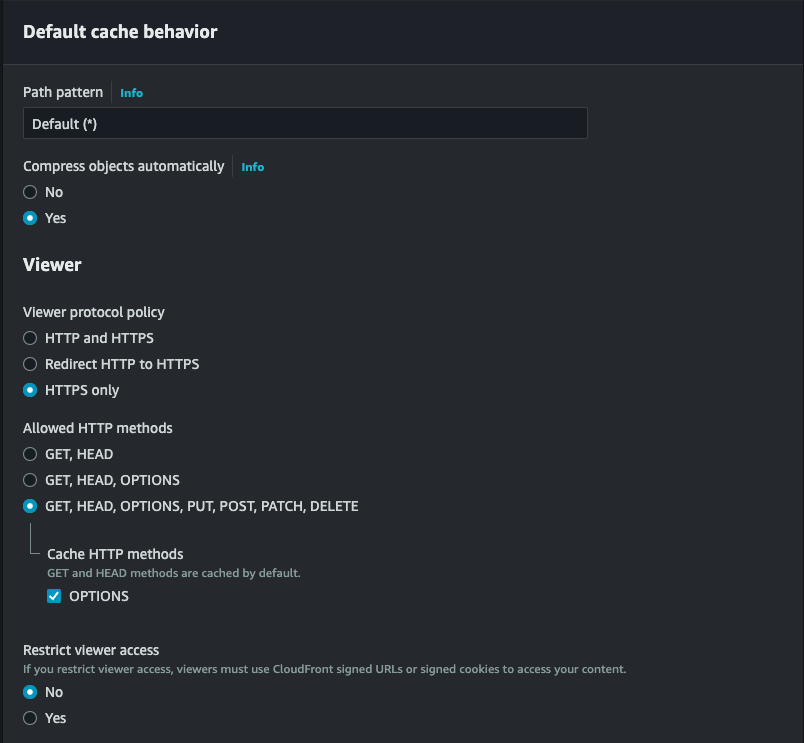
- Scroll down to Default Cache Behavior Settings:
- Viewer Protocol Policy: Choose HTTPS only.
- Allowed HTTP Methods: Select GET, HEAD (and add OPTIONS if you need CORS for cross-origin requests).
-
Cache Policy and Origin Request Policy: Use the CachingDisabled policy and AllViewerExceptHostHeader policy.
-
Web Application Firewall set to Do Not enable security protections. N.B For production workloads enable WAF.

Step 3: Configure Distribution Settings for North America and Europe Regions
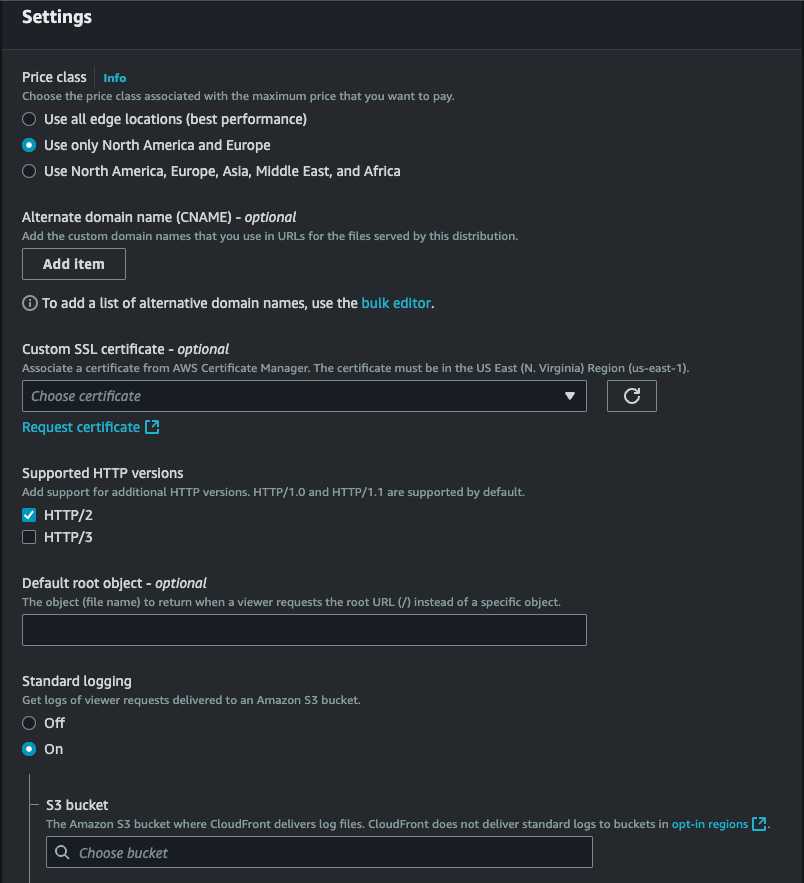
- In the Distribution Settings section:
- Price Class: Select Use Only North America, and Europe to limit the distribution to these geographic regions.
-
Logging: Enable Standard Logging if you’d like to monitor requests to your distribution. You’ll need to select an S3 bucket to store the logs.
-
Alternate Domain Names (CNAMEs): Add custom domain names if desired, such as
api.example.com. Ensure you’ve created the necessary DNS entries in Route 53 or another DNS provider. - SSL Certificate: Select Default CloudFront Certificate if you’re using the CloudFront domain, or choose Custom SSL Certificate if using a custom domain name with HTTPS. (This requires an SSL certificate in ACM).
-
IPv6 set to on
-
Add a Description if you want
-
Click on Create distribution
Step 3: Restrict Access to UK and Ireland Only
- Once the Distribution has been created click on Security tab

- Find CloudFront Geographic Restrictions and click the Edit button beside countries

- Under Restriction Type, select Allow List.

- In the Countries dropdown list, choose Ireland and United Kingdom. Only requests from these countries will be allowed access.

- Click on Save changes.

Note: It can take a few minutes for CloudFront to deploy the distribution and make it available. You can monitor the status in the CloudFront console under Distributions.
Step 6: Test the CloudFront Distribution
-
Once the status changes to Deployed, copy the Domain Name for your CloudFront distribution (e.g.,
d1234.cloudfront.net). -
Open a browser or API testing tool (like Postman) and test the endpoint. Append the resource path if required (e.g.,
/testif your API Gateway has a/testresource). -
Verify that the API responses are successfully served for requests originating from the UK and Ireland. Requests from other locations should be denied with a 403 Forbidden error.
Step 7: Monitor and Manage the Distribution
-
In the CloudFront console, navigate to Distributions and select your distribution to view analytics and logs.
-
Click on View metrics in the top right for detailed metrics and monitoring.

Conclusion
In this blog we have created a Regional API Gateway REST Endpoint and a CloudFront Distribution that points to our API Gateway. As it currently stands the API Gateway can be accessed directly using the Invoke URL or the CloudFront Distribution URL. In part 2 of this blog we will expand on the above configuration by adding a custom header to CloudFront. This will be used within my API Gateway Resource policy. This will prevent access to API Gateway via the Invoke URL. Finally in part 3 will add the final layer of protection which is a Lambda authoriser.
