
AWS Cloud WAN - Part Two Implementation
Introduction
Welcome to Part Two of the AWS Cloud WAN series. In Part One we covered the design concepts behind Cloud WAN, including core components, segmentation strategy, connectivity models, and security considerations. In this post I’m going to walk through the implementation of a Cloud WAN network, taking you from creating the global network through to attaching VPCs and verifying connectivity.
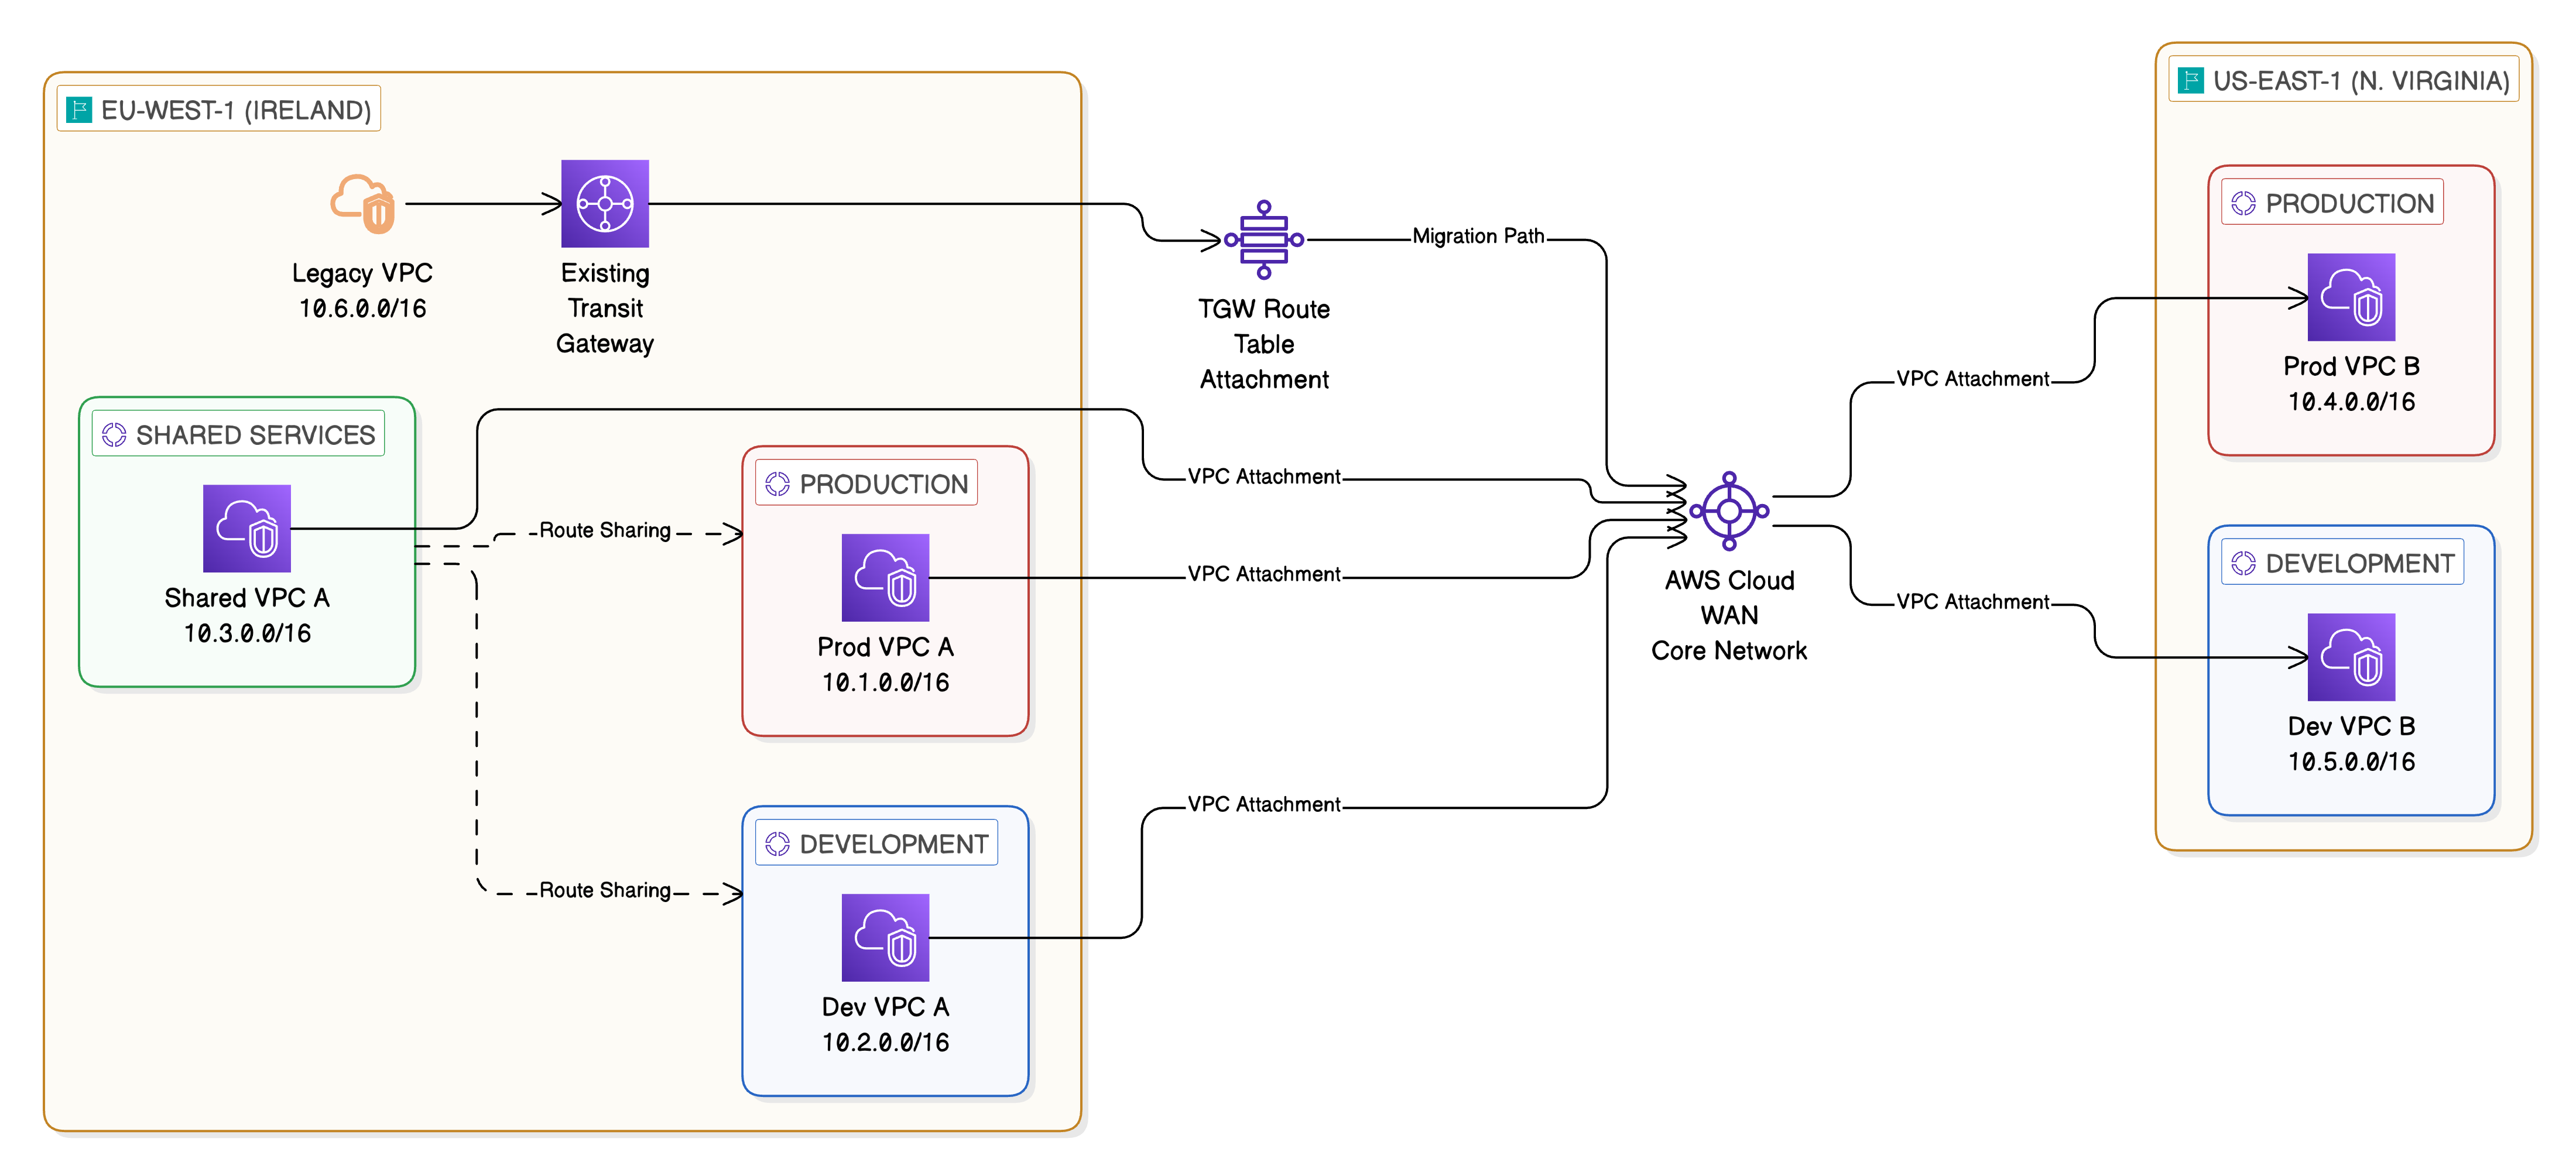
The architecture we’re building consists of a core network spanning two AWS Regions (eu-west-1 and us-east-1) with three segments: Production, Development, and Shared Services. We’ll also cover how to integrate an existing Transit Gateway for migration purposes.
As with Part One, the architecture diagrams in this post have been created using Eraser.io.
Prerequisites
Before beginning the implementation, ensure you have the following in place:
- An AWS account with appropriate IAM permissions for Cloud WAN, VPC, and Network Manager operations
- At least two VPCs in the regions you plan to include in your core network, each with dedicated subnets for Cloud WAN attachments (a /28 CIDR per Availability Zone is sufficient)
- Familiarity with the AWS Management Console and basic networking concepts
- (Optional) An existing Transit Gateway if you plan to test the peering and migration workflow
Title: Target Implementation Architecture
Step 1: Create a Global Network
The Global Network is the top-level container for all Cloud WAN resources. To create one:
-
Navigate to the AWS Management Console and search for VPC in the search bar
-
In the left-hand navigation pane, scroll down to Network Manager and select Global networks
-
Select Create global network
- Provide the following details:
- Name: Enter a descriptive name such as “Enterprise-Global-Network”
- Description: Optionally add a description for the global network
- Select Create global network to complete the creation
The global network is now created and will serve as the parent resource for the core network.
Step 2: Create a Core Network
With the global network in place, we can now create the core network.
-
Navigate to the global network you created in Step 1
-
Select Core networks from the navigation and then Create core network
- Provide the following details:
- Name: Enter a name such as “Enterprise-Core-Network”
- Description: Optionally add a description
- Under Edge locations, select the AWS Regions where you want the core network to operate. For our design, select:
- eu-west-1 (Europe - Ireland)
- us-east-1 (US East - N. Virginia)
-
For each edge location, you can configure the ASN (Autonomous System Number) range. Cloud WAN assigns ASNs from the range you specify for BGP peering. The default range is typically sufficient unless you have specific ASN requirements for your organisation.
- Select Create core network
Cloud WAN will begin provisioning the core network infrastructure across your selected regions. This process takes several minutes as AWS provisions the underlying networking resources in each region.
Step 3: Define Core Network Policy
The Core Network Policy is the central configuration document that defines segments, attachment policies, and routing behaviour. You can edit this through the console or by providing a JSON document directly.
-
Navigate to your core network and select Policy versions
-
Select Edit current policy or Create new policy version
-
Define your segments, attachment policies, and segment actions. Below is a complete policy document for our three-segment design:
{
  "version": "2021.12",
  "core-network-configuration": {
    "vpn-ecmp-support": true,
    "asn-ranges": [
      "64512-65534"
    ],
    "edge-locations": [
      {
        "location": "eu-west-1",
        "asn": 64512
      },
      {
        "location": "us-east-1",
        "asn": 64513
      }
    ]
  },
  "segments": [
    {
      "name": "production",
      "description": "Production workloads",
      "require-attachment-acceptance": true,
      "isolate-attachments": false,
      "edge-locations": [
        "eu-west-1",
        "us-east-1"
      ]
    },
    {
      "name": "development",
      "description": "Development and testing workloads",
      "require-attachment-acceptance": true,
      "isolate-attachments": false,
      "edge-locations": [
        "eu-west-1",
        "us-east-1"
      ]
    },
    {
      "name": "shared-services",
      "description": "Centralised shared services",
      "require-attachment-acceptance": true,
      "isolate-attachments": false,
      "edge-locations": [
        "eu-west-1",
        "us-east-1"
      ]
    }
  ],
  "attachment-policies": [
    {
      "rule-number": 100,
      "condition-logic": "or",
      "conditions": [
        {
          "type": "tag-value",
          "operator": "equals",
          "key": "segment",
          "value": "production"
        }
      ],
      "action": {
        "association-method": "tag",
        "tag-value-of-key": "segment"
      }
    },
    {
      "rule-number": 200,
      "condition-logic": "or",
      "conditions": [
        {
          "type": "tag-value",
          "operator": "equals",
          "key": "segment",
          "value": "development"
        }
      ],
      "action": {
        "association-method": "tag",
        "tag-value-of-key": "segment"
      }
    },
    {
      "rule-number": 300,
      "condition-logic": "or",
      "conditions": [
        {
          "type": "tag-value",
          "operator": "equals",
          "key": "segment",
          "value": "shared-services"
        }
      ],
      "action": {
        "association-method": "tag",
        "tag-value-of-key": "segment"
      }
    }
  ],
  "segment-actions": [
    {
      "action": "share",
      "mode": "attachment-route",
      "segment": "shared-services",
      "share-with": [
        "production",
        "development"
      ]
    }
  ]
}
Key points about this policy:
- Attachment policies use tag-based association. When a VPC attachment is tagged with
segment: production, it is automatically associated with the Production segment. This simplifies governance and allows automation through tagging standards - Segment actions configure the Shared Services segment to share its routes with Production and Development, enabling workloads in those segments to reach centralised resources
- require-attachment-acceptance is enabled on all segments, ensuring manual approval before any attachment becomes active
- Review the policy and select Apply policy to create a new policy version. Cloud WAN will validate the policy and begin applying the changes.
Step 4: Create VPC Attachments
With the core network and policy in place, we can now attach VPCs to the core network.
-
Navigate to your core network and select Attachments
-
Select Create attachment
- Configure the attachment:
- Attachment type: Select VPC
- Edge location: Select the region where your VPC resides (e.g. eu-west-1)
- VPC ID: Select the VPC you want to attach
- Subnet IDs: Select the dedicated Cloud WAN attachment subnets in each Availability Zone
- Add the appropriate tags:
- Key:
segment - Value: The segment name this VPC should join (e.g.
production,development, orshared-services)
- Key:
-
Select Create attachment
-
Because we enabled
require-attachment-acceptance, the attachment will be in a Pending state. Navigate to the attachment and select Accept to activate it. - Repeat this process for each VPC you want to attach to the core network.
Important: After creating VPC attachments, you must update the VPC route tables to direct traffic towards the Cloud WAN attachment. Add a route for the destination CIDR ranges (or a default route of 0.0.0.0/0) with the target set to the core network attachment.
Step 5: Configure Routing
Once your VPC attachments are active, Cloud WAN automatically populates the segment route tables based on the attached VPC CIDR ranges and any segment sharing rules defined in the policy.
To verify the routing:
-
Navigate to your core network and select Routing
-
Select a segment (e.g. Production) to view its route table
- You should see:
- Routes for VPCs attached to the Production segment (propagated from attachments)
- Routes from the Shared Services segment (propagated through the share segment action)
- If you need to add static routes (for example, to route traffic to a specific CIDR via a particular attachment), you can do this through the Core Network Policy by adding entries to the
segment-actionssection.
For cross-region routing, Cloud WAN automatically handles the route propagation between regions. A VPC attached to the Production segment in eu-west-1 will automatically have reachability to a VPC attached to the Production segment in us-east-1 without any additional configuration.
Step 6: Verify Connectivity
With attachments active and routing configured, it’s important to verify that connectivity is working as expected.
Using Route Analyser
AWS Network Manager includes a Route Analyser tool that allows you to test reachability between resources without sending actual traffic.
-
Navigate to your global network in Network Manager
-
Select Route Analyser from the navigation
- Configure a route analysis:
- Source: Select a VPC attachment (e.g. Prod VPC A in eu-west-1)
- Destination: Select another VPC attachment (e.g. Prod VPC B in us-east-1)
- Run the analysis. The Route Analyser will trace the path through the core network, showing you:
- The segments traversed
- The route table entries matched
- Whether the path is valid and reachable
Testing with EC2 Instances
For end-to-end validation, launch EC2 instances in the attached VPCs and test connectivity:
-
Launch an EC2 instance in Prod VPC A (eu-west-1) and another in Prod VPC B (us-east-1)
-
Ensure security groups allow ICMP and any application-specific ports
-
Use ping or a similar tool to test connectivity between the instances
-
Test cross-segment isolation by attempting to reach an instance in the Development segment from the Production segment — this should fail as the segments are isolated
-
Test Shared Services reachability by connecting to a resource in the Shared Services segment from both Production and Development — this should succeed due to the route sharing configuration
Integration with Existing Transit Gateway
For organisations migrating from a Transit Gateway architecture, Cloud WAN supports Transit Gateway peering. This allows you to run both architectures in parallel during the migration.
Creating a Transit Gateway Peering
-
Navigate to your core network and select Attachments
-
Select Create attachment and choose Transit Gateway Route Table
- Configure the peering:
- Transit Gateway ARN: Enter the ARN of your existing Transit Gateway
- Transit Gateway route table: Select the route table you want to peer with
-
Tag the attachment with the appropriate segment tag
- Accept the attachment when it enters the Pending state
Once the peering is established, routes from the Transit Gateway will propagate into the associated Cloud WAN segment, and routes from Cloud WAN will be available in the Transit Gateway route table.
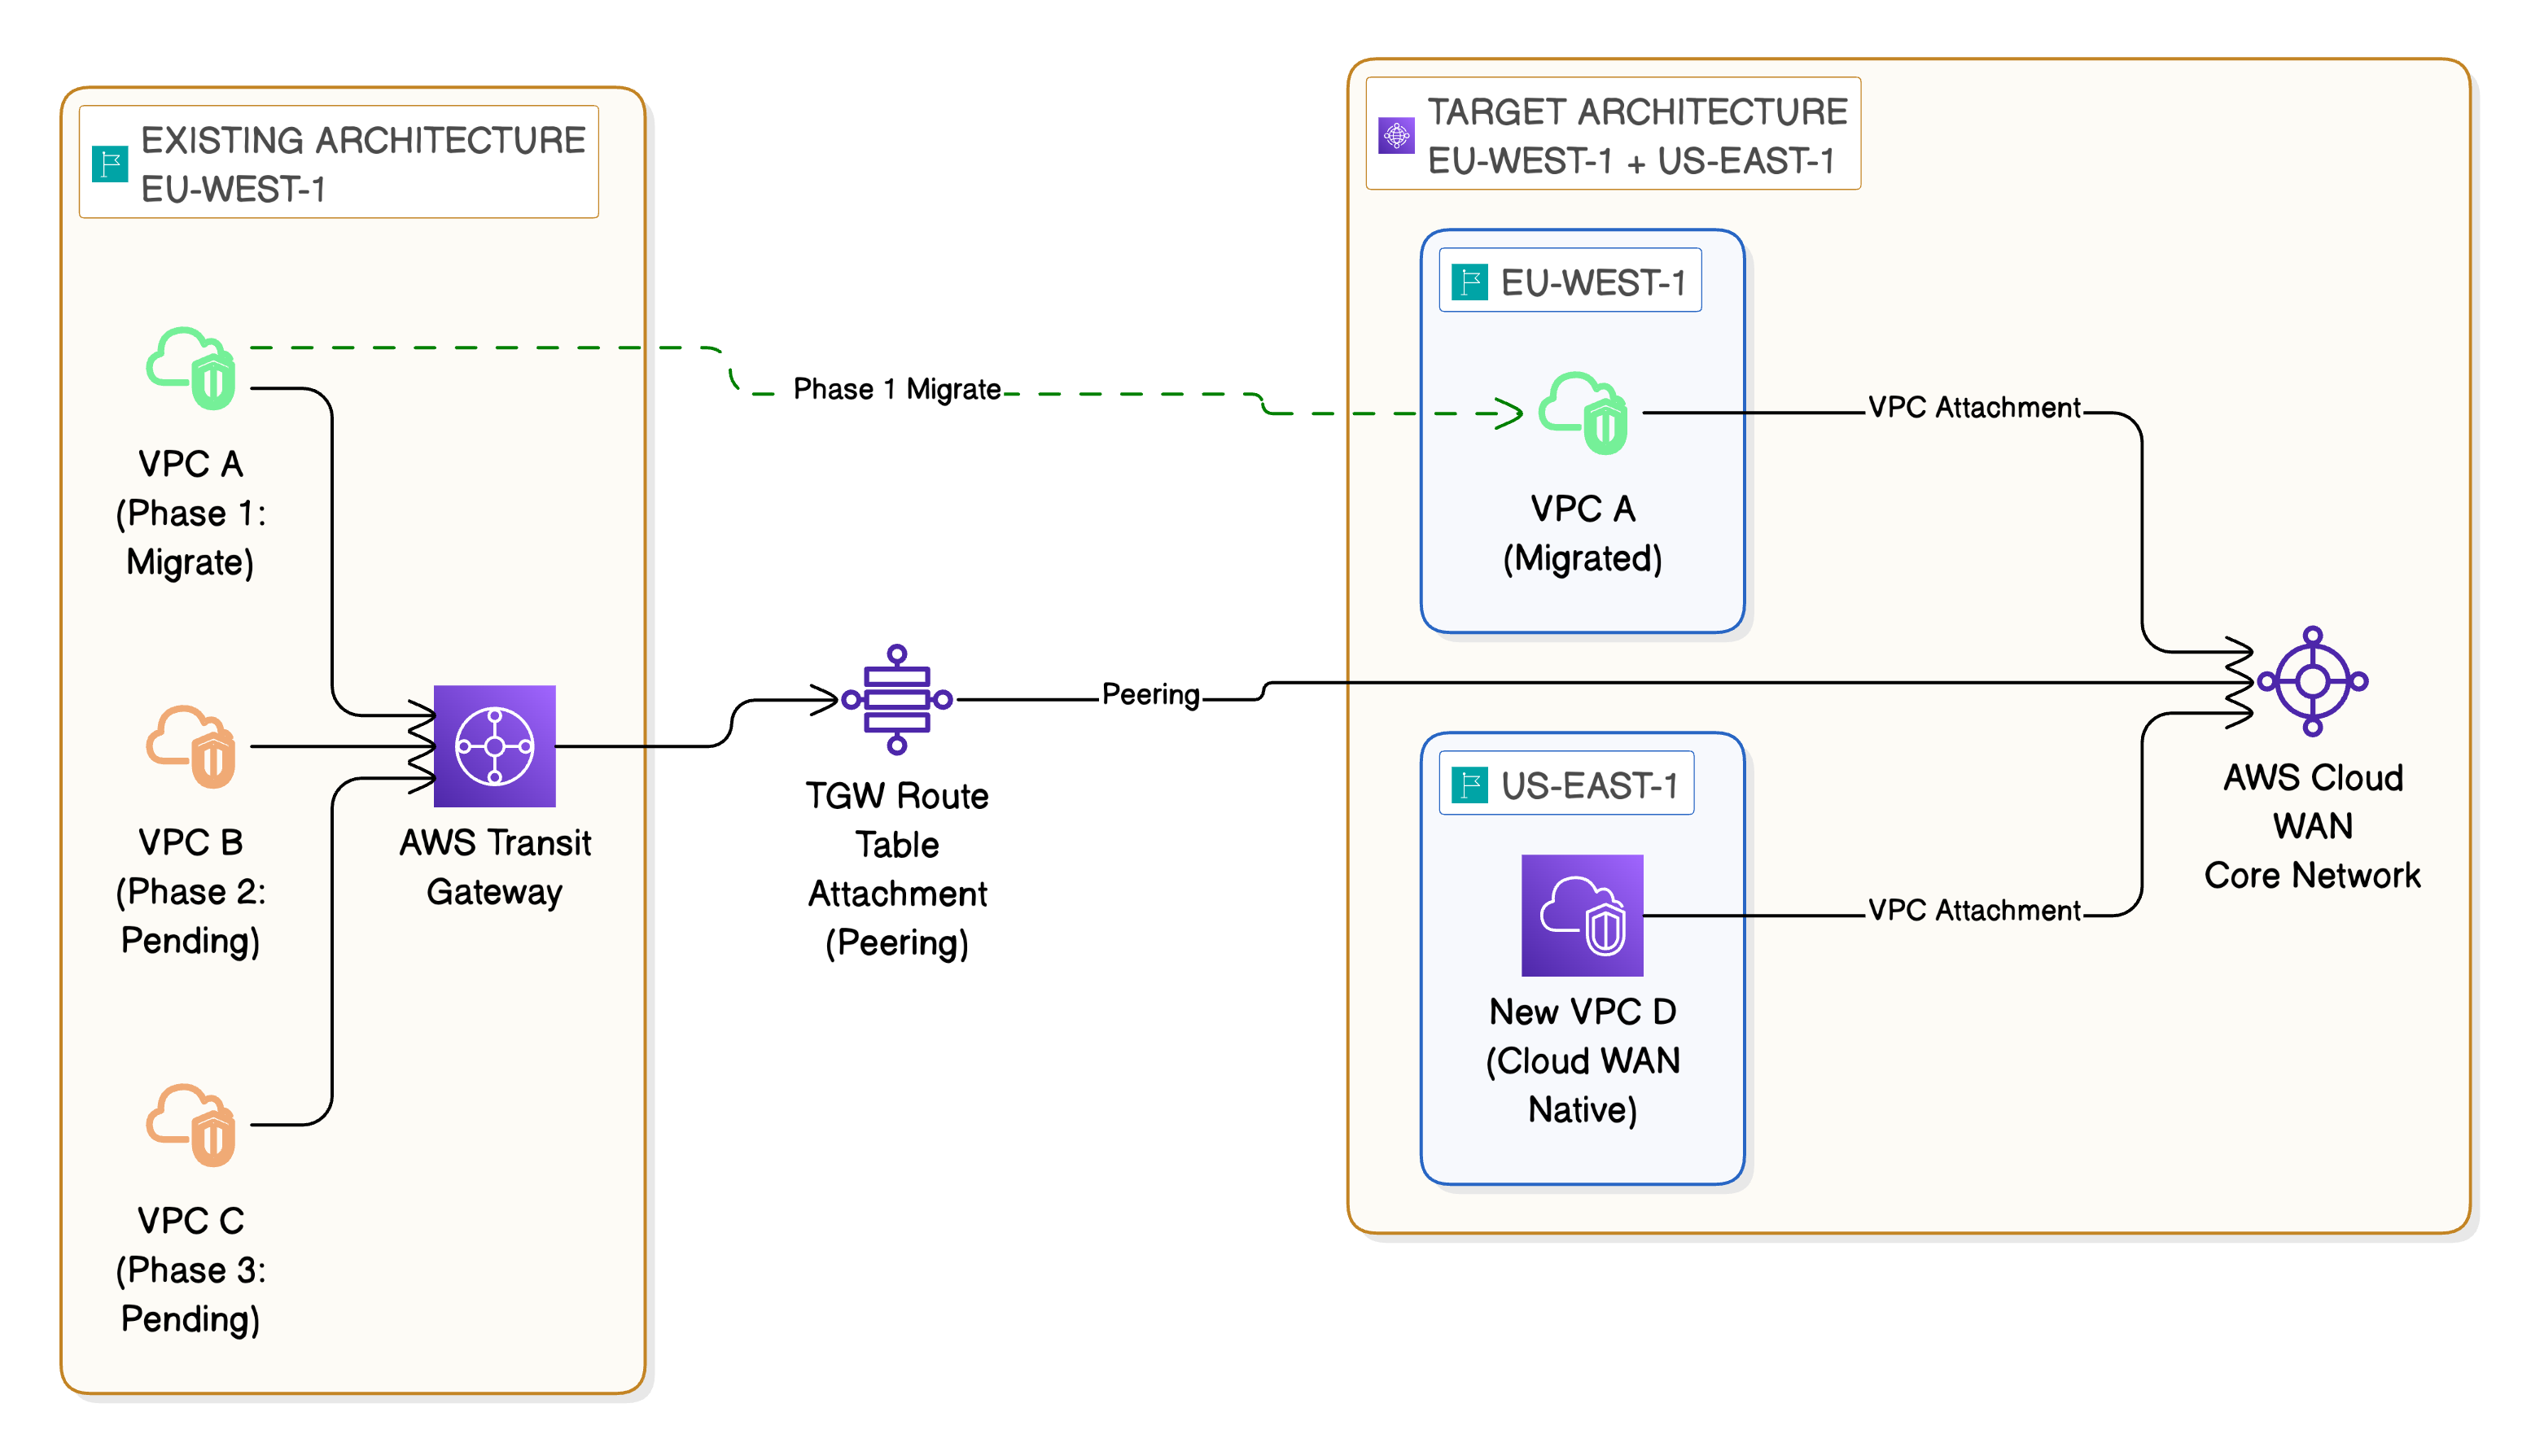
Migration Approach
A recommended migration approach is:
- Establish peering between Cloud WAN and your existing Transit Gateway
- Verify connectivity between Cloud WAN-attached VPCs and Transit Gateway-attached VPCs
- Migrate VPCs incrementally, detaching them from Transit Gateway and reattaching to Cloud WAN
- Validate at each stage using the Route Analyser and end-to-end connectivity tests
- Decommission the Transit Gateway peering once all VPCs have been migrated
This approach minimises disruption and allows you to roll back individual VPC migrations if issues arise.
Transit Gateway to Cloud WAN Migration — Phased Approach
Monitoring and Operations
Once your Cloud WAN network is operational, ongoing monitoring is essential. AWS provides several tools for this.
AWS Network Manager Dashboard
The Network Manager dashboard provides a graphical view of your entire network topology. From here you can:
- View all attachments and their status
- Monitor core network events such as policy changes and attachment lifecycle events
- Visualise the network topology across regions
CloudWatch Metrics
Cloud WAN publishes metrics to Amazon CloudWatch, including:
- BytesIn / BytesOut: Traffic volume per attachment
- PacketsIn / PacketsOut: Packet counts per attachment
- DroppedPackets: Packets dropped due to policy or routing issues
Setting up CloudWatch alarms on these metrics provides proactive alerting for connectivity issues or unexpected traffic patterns.
Route Analyser
As covered in Step 6, the Route Analyser is useful not just for initial validation but for ongoing troubleshooting. When connectivity issues arise, the Route Analyser can quickly identify whether the issue is at the routing layer or elsewhere in the stack.
CloudWatch Logs and Events
Cloud WAN integrates with CloudWatch Logs for detailed event logging. Policy changes, attachment state changes, and route propagation events are all recorded and can be used for audit and compliance purposes.
Summary
In this second part of the series we’ve walked through the full implementation of an AWS Cloud WAN network. We created a global network, defined a core network with a policy-based configuration, attached VPCs across multiple regions, and verified connectivity using the Route Analyser and end-to-end testing.
We also covered how to integrate an existing Transit Gateway for a phased migration approach, allowing you to move workloads incrementally from Transit Gateway to Cloud WAN without disruption.
The key takeaways from the implementation are:
- Cloud WAN uses a declarative policy model — define what you want and the service provisions it
- Tag-based attachment policies simplify governance and align with existing tagging standards
- The Route Analyser is an invaluable tool for both initial validation and ongoing troubleshooting
- Transit Gateway peering provides a safe migration path from existing architectures
I hope you’ve found this series useful. Cloud WAN is a significant step forward in how we manage global network infrastructure on AWS, and I expect it to become the standard approach for multi-region enterprise deployments.